Part I: What is the Best Video Format to Upload to YouTube?
Are you a newcomer that wants to upload the video to Youtube? Well, the process is not difficult but you must know some of the basic knowledge before you do it. Those included knowing the Youtube video file format, video & audio codec, resolution, aspect ratio, and more.
According to Youtube, the recommended video format is MPEG/MP4 so you can produce or convert the video to MP4 before uploading it to Youtube. Of course, Youtube supports many other video formats too. For the other requirements, you can read their formatting guidelines here.
How about those that want to backup or digitize their favorite DVDs content and share it on Youtube? Yes, this article will cover the details on how to upload a DVD to Youtube successfully.

Part II: Is Uploading DVD to Youtube Legal?
You may wonder it’s legal to rip all the DVD videos and upload them to Youtube and set them to private? The answer is yes and no.
As you may know, there are mainly two types of DVDs, the normal/homemade DVDs as well as the commercial/encrypted DVDs.
If you just upload an unencrypted DVD like your own wedding video, then it’s perfectly fine. This is your own make DVD or often refers to as homemade DVD.
However, it’s illegal to rip the commercial DVDs and upload them to Youtube. You cannot do that because all the commercial DVDs contain copyrights or intellectual property and you simply cannot share the contents without permission.
How about you recorded the copyrighted live TV show and want to upload it to Youtube? We do not recommend that as it’s illegal to redistribute the copyrighted video content and share it with others.
However, if you upload the copyrighted TV show videos and set the video to private, it should be not a problem but only you can watch the movies and not other people.
Note: As the legal issue is different from one country to another, it’s better to seek your local relevant authority for advice.
Part III: How to Upload a DVD to Youtube?
Basically, there are two steps to upload a DVD to Youtube:
- Rip the DVD content to Youtube compatible formats using a DVD ripper.
- Upload to Youtube as a normal video.
As most of the standard DVDs file is store in MPEG-2 format, you need to rip it so that it can be supported by Youtube. Currently, Youtube supports many formats including MP4, MPEG-4, MOV, FLV, AVI, WMV, WebM, MPEG-PS, DNxHR, 3GPP, GineForm, ProRes, and HEVC.
Out of so many video formats supported by Youtube, the MP4 is the most common format. Hence, we will guide you to rip the DVD to the MP4 format in the following section.
Also, if your video is longer than 15 minutes, make sure you get the Youtube account verified.
Now, which dvd ripping software to use?
Well, we have done comprehensive reviews on different software you can use for both Windows and Mac. To save your time, here are our picks:
Why we do not recommend the free rippers? Well, throughout our reviews we found that the free tools somehow have some limitations i.e. unable to rip copy-protected discs, slow ripping speed, the output file quality drop, and more.
The recommended DVD rippers are able to rip almost all kinds of DVDs, including commercial discs with different types of copy-protections like Sony ARccOS, RCE, APS, UOPs, Sony ARccOS, and more.
Part IV: Step-by-step Guide to Rip & Upload a DVD to Youtube
Pre-requirements: Your computer needs to have DVD optical drive. Else, you can use the external DVD drive with a USB connection.
Software to use: WinX DVD Ripper Platinum for Windows 10/8/7.
In order to use the software, you need to download and install the WinX DVD software successfully. Then, follow the steps below:
Step 1: Insert the DVD to Rip
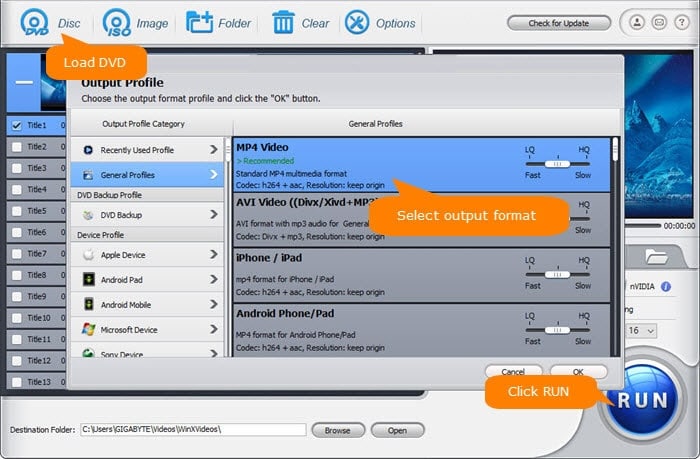
Launch the WinX DVD Ripper Platinum. From the main screen, click on the DVD Disc (at the top left corner) to load a DVD disc.
A new window will pop up asking you to select the source DVD disc. Usually, the program will auto-detect correctly. Else, you choose your computer DVD drive and click OK. A new window will pop up.

Step 2: Choose the Output File Format
To choose the Output Profile, under the Web Video Profile select the Youtube Video and choose then MP4 Video before pressing the OK button.
Step 3: Set the Destination Folder
At the bottom of the screen, you will see the Destination Folder:, click on the Browse button to let you choose where to store the ripped file. Click OK.
To start ripping the disc, click on the RUN button.
Step 4: Upload the ripped file to Youtube
Go to Youtube.com and login to your account. If you don’t have it, create one. Then, click the Upload button at the top of the screen.
Choose the video privacy (Public, Private or Unlisted) and select the ripped DVD file to be uploaded to Youtube.
While uploading the video, you can edit the basic info and some advanced settings. When finish uploading, just click the Publish button.
Special note:
If you use other software, the ripping process may be a little different but the steps to upload the video to Youtube are the same.
Conclusion
After you read this article, now you know that the process to upload DVDs to Youtube is not difficult. Now it’s your turn to get your mouse moving and put the steps into practice.
You may wonder why we do not suggest you use the free ripper? Well, most of them have some kind of limitations. You better use the two programs recommended above for Windows and Mac.
Should you have any problem when dealing with rip and upload a DVD to Youtube, you can comment below or contact us.