Are you thinking of recording your streaming video for later use? Or are you a visitor who wants to record a streaming video and save it for later use? No matter which one you are, you should know how to record streaming video.
If you are the video streamer, there are high chances that you’ll still wish to record the live stream, maybe not for your personal use, but for the sake of your audience who may or may not catch your live streaming on your program.
Some platforms (for example YouTube) convert the live stream automatically to VOD (Video on demand) format. Nevertheless, by recording streaming video online, you can edit it for promotional and marketing purposes. But the question is how to record streaming video.
Top 5 Tools to Record Streaming Videos
I.) How to Record Streaming Video Using Screen Recorder Software?
While there’re several options available for recording a live streaming video with an in-built screen capture software, hardware, or a screen recorder, each type has its disadvantages. For example, encoding hardware is prohibitively costly and can become obsolete easily with each advancement in technology.
That is why there are many recorder software that can help you record streaming videos. Among those tools, we have chosen 2 recorder software which is Movavi Screen Recorder (paid) and ScreenRec (free).
So, let’s now know in detail about these tools and know how to record streaming videos using these tools.
1.) Using Movavi Screen Recorder
Movavi Screen Recorder is a paid software for recording streaming videos. It allows you to set up the recording parameters easily, grab video & audio, and also let you edit it to save the content for later use.
You can select the particular capture error by setting up the recording parameters. It means you will capture only the part you want to save from the screen.
The live stream recorder of Movavi doesn’t need cumbersome add-ons or clunky hardware. Rather, it makes things simple to easily capture screen activity as well as save it to any video format you want.
Key Features of Movavi Screen Recorder:
- Easy to use, come with an intuitive interface
- Captures video & audio streams simultaneously or separately
- Easy sharing to Google Drive or YouTube
- Allow audio-only recordings
- Option to show mouse while recording and allow to use keystrokes
- It can take screenshots and edit them
Official page: https://www.movavi.com/screen-recorder/
The Step-By-Step Guide to Record Streaming Video
Before start using the software, you must download the right version of the software from the official site and follow the on-screen instructions to install the program. Then, let’s have a look to learn how to record streaming videos.
To Capture and Save the Recording
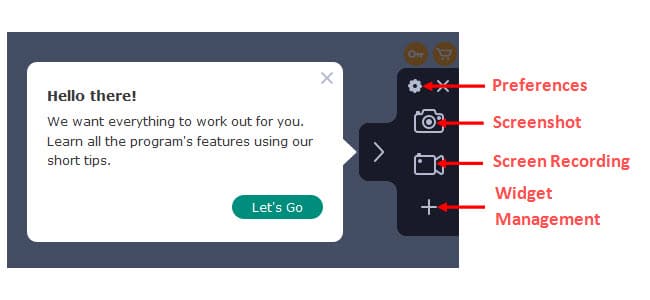
- Launch the software and you will see the Hello there! Screen. Just click the close on the top-right corner.
- As an example, we will open the Microsoft Word as an example for recording:
- Click on the “Screen recording” button on the sidebar. Choose and drag the mouse of the screen to capture the particular area on your screen to capture. You will see several buttons as follow:
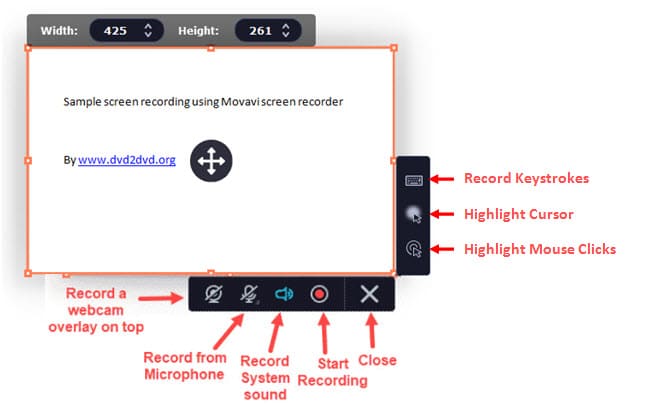
Image source: www.dvd2dvd.org
Note: You can activate the “System sound” option or the “Microphone” option to record the sound from the computer system or through a microphone.
- To start recording the video, hit the “Start Recording” button or press the F10 key. Click on the “Pause” option when you want to take a break. To finish, click on the “Stop”
- To edit and share the recording, use the “Scissors” option to cut down unwanted pieces from the recording. Also, you can click the specific button to share the recording on social media sites.
- After that, click the “Export” button, choose the format for output, and then hit “Save” to finish.
2.) Using ScreenRec – Free Screen Recorder
ScreenRec is a completely free tool for recording any screen activity. It was primarily designed to be a productivity app, recording a video using it is even possible. With its simple interface and small size, it is a great option for those having average PCs.
The Key Features of ScreenRec:
- Recording the screen activity using a webcam, system sound, and microphone.
- Taking some informative screenshots of the screen by adding shapes, arrows, and also bubbles.
- Hosting your content on an online platform.
- Sharing the recordings and screenshots through a cloud service.
Official page: https://screenrec.com/screen-recorder/
The Step-by-step Guide to Using the ScreenRec
Before start using the program, you must download, & install the ScreenRec software. Simply visit the official webpage to download the software. Then, double-click on the downloaded installer .exe file and follow the on-screen instructions to finish the installation.
Please note that you are required to install Microsoft Visual C++ in order to run the ScreenRec. Here is the step-by-step guide on how to record streaming video using ScreenRec.
1. Launch the Screenrec and you will see a small “screenrec” vertical bar on your screen. Point to it and click on the “Record your screen” icon. You will see something like the following screen (not the background pictures):

2. Click and drag your mouse on your computer screen to choose the area to record. You will see a few icons on the lower-left area of the selected area.
- Photo camera icon – click on it to take a screenshot
- Video camera icon – click on it to record the screen. When finished, click on the stop button. During the recording, you can turn on/off the microphone, webcam, & system audio.
3. After recording, you can instantly play it, share it or save it to your computer.
Note:
- During video recording, you will get disable/enable the system audio, and microphone
- When you are done recording, press the Stop And you will get a shareable link copied to the clipboard shortly.
- Alternative shortcut: Press the Alt+S combination keys to start or stop the recording.
II.) How to Record Streaming Video Using an Online Recorder?
There are not many trustworthy screen recorders that help you record the screen online. To help you know how to record streaming video for free using a web-based online recorder, I have picked the best online recorder which is Apowersoft Free Online Screen Recorder.
The main advantages of an online recorder are that you do not need to install it in order to use the tool but you need a stable internet connection.
3.) Using Apowersoft Free Online Screen Recorder
Let’s know in detail about Apowersoft online screen recorder and how to record streaming video without having to install the software. Here are some of the key features:
- It records audio and video on your PC, including narration or voiceover. There is no time restriction, and you can export recordings into numerous formats.
- It is an easy-to-use screen recording software, which allows you to record the Windows PC’s audio and screen.
- You can use this program without having any technical knowledge or skills. as soon as it comes to screencasts, capturing audio, and screenshots, Apowersoft is an ideal option.
Official page: https://www.apowersoft.com/free-online-screen-recorder
Step-By-Step Guide to Use Apowersoft Screen Recorder
Here is how to record streaming video using an Apowersoft screen recorder
- Go to the official Apowersoft website.
- Now click on the “Start Recording” button and you will see the following screen.
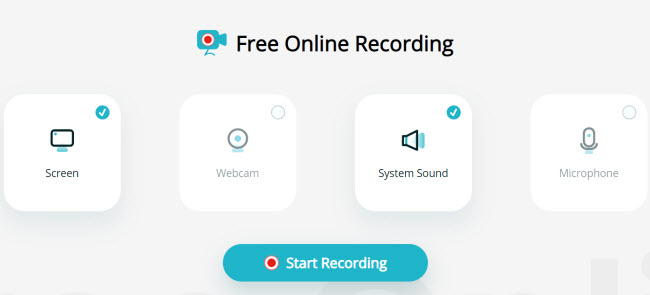
3. There are 4 options available:
- Screen – Choose this option if you want to record the computer screen.
- Webcam – Select this option if you are recording the webcam on your computer.
- System sound – The app will use the internal sound system on the computer.
- Microphone – Choose this option if you want to record the sound from the external microphone that is connected to the computer.
4. Click on the “Start Recording” button. A new window will show up as follow:
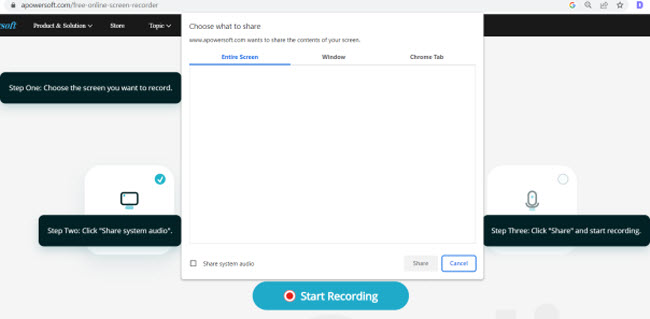
There are 3 recording modes available:
- Entire screen – will record all the activities on the entire screen, you can move the cursor from one screen (window or tab) to another.
- Window – you can choose which window to record (from all the existing windows that are open) and the app will record the particular window only.
- Chrome Tab – The app will record a particular chrome tab only. If you move to another tab on Chrome, it will not be recorded.
5. To record the entire screen, click on the image under the “Entire Screen” to select it. Also, check the “Share system audio” option before clicking on the “Share” button to start the recording. You will see the screen below:
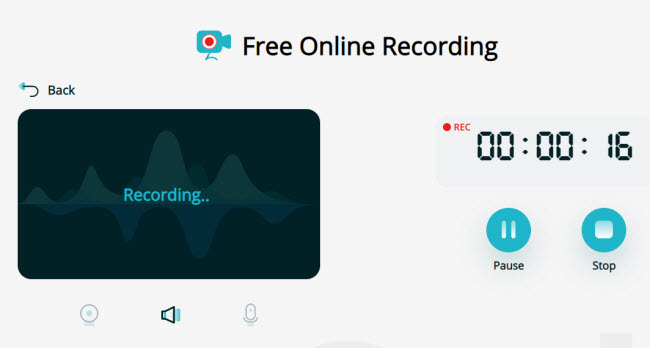
6. As you can see, the screen will see the timing as well as the “Pause” and “Stop” buttons. To finish the recording, click on the “Stop” button.
7. Click on the “Save” button to save the recorded file to your computer. It will be in .webm format.
As you can see, there are several limitations on the Apowersoft free screen recorder such as:
- The output file is limited to .webm only.
- The recording time length is limited to about 30-minute.
- No custom area recording (a portion of the screen) is available.
Hence, if you are not happy with the free version, you can upgrade to the Apowersoft Online Screen Recorder Pro version.
III.) How to Record Streaming Video Using a Video Converter?
Do you want to save as well as relive a live program or a live show, using a video converter? Well, some of the video converter not only has the conversion function but also can record and download videos.
Those video converters include VideoProc Converter, Wondershare UniConverter, and Wonderfox HD Video Converter Factory Pro. Here, we are introducing HD video converter factory pro as well as the process of how to record streaming video using it.
4.) Using Wonderfox HD Video Converter Factory Pro
The WonderFox HD Video Converter Factory Pro program is provided with a well-suited converter and basic recorder. It can download online videos, convert them, and you can record online-streaming videos easily as well as make gif files.
It has a screen recorder to offer you the simplest method to record your PC screen to output files including MP4, AVI, MOV, and MKV formats. You can utilize it to record all you want, like video meetings, gameplay, video tutorial, streaming video, etc.
Additionally, the WonderFox Converter allows you to record gaming as well as audio-only mode lets you record live music streams, songs, concerts, ASMR, opera, and so many more in MP3, AC3, AAC, and WAV format.
Official page: https://www.videoconverterfactory.com/hd-video-converter/
Step-By-Step Guide to Using Wonderfox HD Video Converter
The entire recording procedure is very simple. Here is the step-by-step guide on how to record the streaming video:
1. Go to the official site and free download the WonderFox HD Video Converter Factory Pro.
2. Install the software, and if you buy it, you can activate the software.
3. Launch the HD Video Converter Factory Pro. You will see the following screen:
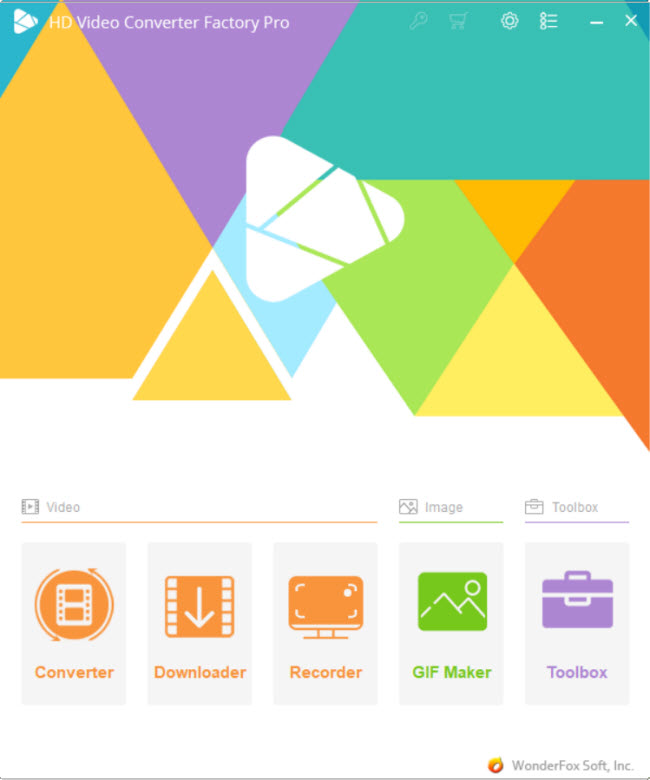
4. Click on the “Recorder” option and you will see the following screen. This allows you to record anything that plays on your computer screen.
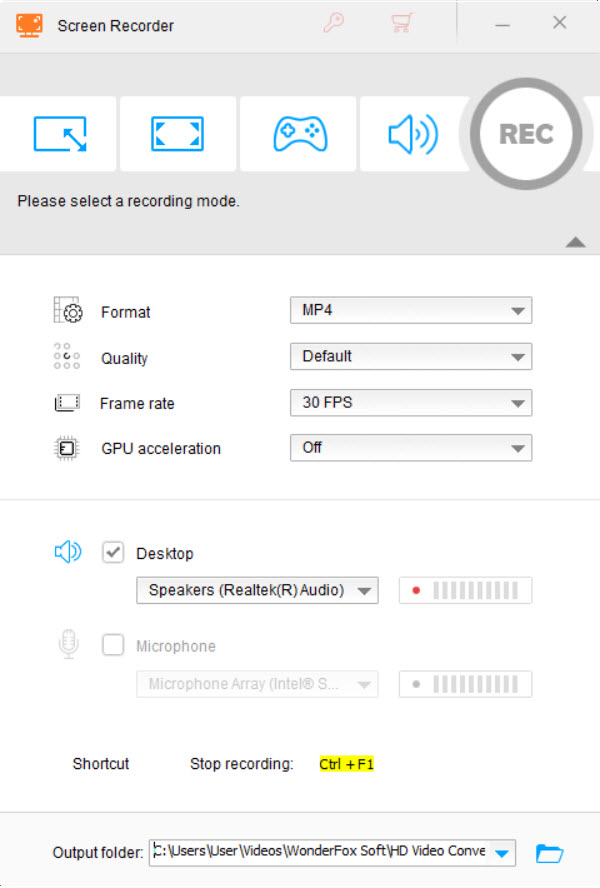
From the screen, there are 4 main buttons on the top with a “REC” button on the right. You need to choose one of them to start the recording.
- Left button – allow you to choose the area to record by dragging your mouse.
- 2nd left button – choose this option if you want to record the entire screen.
- 3rd left button – best for gaming recording at 60 fps.
- Last button – to record the audio only, no video will be recorded.
5. For example, we choose the 2nd left (full screen) recording button. Then, click the “OK” button.
6. You can choose the settings like format, quality, frame rate, etc. as well as change the “Output folder” location by clicking the bottom inverted triangle button.
7. When ready, click on the “REC” button and start recording. It’ll begin after a 5-second countdown. As soon as you’re done, press the ‘Ctrl + F1’ keys to stop the recording process.
8. Finally, go to the output folder and see the recorded video.
IV.) How to Record Streaming Video Using a Browser Extension?
There are a lot of reasons that one may find any screen recorder helpful. Several screen recorders are available as video converters or downloaders. However, there are even some options that one can run through the browser like a Google Chrome extension.
One such tool is Screencastify. So, let’s now see how to record streaming videos using Screencastify. Moreover, we will know what Screencastify is and how it helps to record streaming videos.
5.) Using Screencastify
Screencastify is a user-friendly option to record streaming videos. You can easily add the extension to your Chrome browser.
Many users engage with this Screencastify tool to edit, record, and also share videos – as well as it is easy to use and get started. To be true, this platform does not take much time to get started and operating it.
The Screencastify platform is a simple method to deliver a more effective, simple message. Instead of having to write down long emails, one can capture the screen to efficiently share that data with others.
Official page: https://www.screencastify.com/products/screen-recorder
To Install and Activate the Screencastify Extension
Here is the tutorial on how to install, and record streaming videos using Screencastify. Please note that you must use the Google Chrome browser.
- Go to the official page: https://www.screencastify.com/products/screen-recorder
- Click on the “Add to Chrome (It’s free)” button. This will bring you to another page:
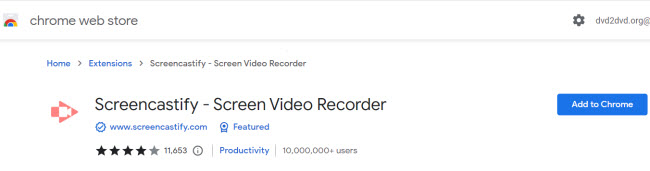
3. Click on the “Add to Chrome” button again, and you will see a small screen popup asking you to add the extension.

4. Click on the “Add extension” button to download and install the extension to the Chrome browser. You will see a small icon on the top-right corner of the screen.
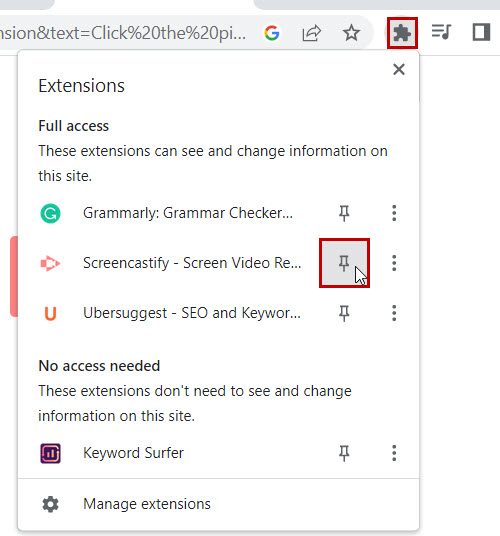
Tip: No seeing the Screencastify icon on your screen? Just click on the “Extensions” icon and click the pin icon next to “Screencastify – Screen Video Recorder”.
Step-By-Step Guide to Using Screencastify
- To start using the extension, click on the Screencastify icon, and you are required to sign in (can use a Google account). After that, you will see the following screen.

There are 3 options available:
- Browser Tab – Choose this option will record that particular browser tab only, switching to other tabs will not be recorded.
- Desktop – Select this option will record the entire desktop screen, you can switch from one screen to another and it will be recorded. This option is recommended.
- Webcam – If you want to record the webcam activities from your computer, choose this option.
2. So, you can choose the “Desktop” option. Now click on the “Record” button. You will see countdown timing, and then the recording will start.
- To record the voice from the microphone, you can click on the “SETUP MICROPHONE ACCESS” button and click the “Enable mic and webcam” button on a new screen.
- For the face, you can use the webcam recording or you can click on the “SETUP CAMERA ACCESS” button.
- Note: My laptop has a webcam but the app still shows “Webcam not detected”, so there is a bug there.
3. You can click on the “Show more options” to do additional settings.
- To change the length of the countdown, click the “drop-down menu and you can select a 3-sec, 5-sec, or 10-sec countdown, or you can turn off the countdown by disabling it.
- To use the drawing tools, allow the toggle next to the “Show Drawing Tools” option (only for Desktop and Browser Tab recordings.)
- To record audio from any application, such as Windows Media Player, or PowerPoint allows the toggle next to the “System Audio” option (only for Windows PCs.)
4. Once ready, click on the “Record” button. At the bottom left corner, there will be a small bar like below.

5. From the drawing tools, you can use different drawing tools, like a pen, eraser, etc., or click on the “Pause” or “Stop” button to finish the recording.
6. The app will save the recorded video to the cloud server and you can run the recorded videos.
Bottom Line
Even though many platforms allow you to save live-stream videos but knowing how to record the streaming video first is important. If you don’t know how to record streaming video, then you won’t be able to use any tool.
No matter whether you are the content creator or the visitor, there are times when you need to record streaming video. Hope this tutorial can help you understand what you need to do to get and save a streaming video online successfully.